Are you looking to add a touch of elegance to your dining table without the hassle of sewing? Look no further than the “No-Sew Table Runner Tutorial.” This step-by-step guide will show you how to create a beautiful table runner, using just a few simple materials and techniques that require no sewing. Whether you’re a beginner or an experienced crafter, this tutorial is perfect for anyone looking to add a stylish and unique touch to their home décor. Get ready to transform your table into a stunning centerpiece with this easy and fun DIY project.

Understanding the Basics of a No-Sew Table Runner
Defining a no-sew table runner
A no-sew table runner is a decorative piece of fabric that is used to adorn a table. Unlike traditional sewn table runners, no-sew table runners are created without the use of a sewing machine or needle and thread. Instead, these runners are crafted using alternative methods, such as fabric glue, iron-on tape, or hemming adhesive. This makes them accessible to individuals who may not have sewing skills or equipment.
Reasons for opting for a no-sew over a sewn table runner
There are several reasons why you might choose a no-sew table runner over a sewn one. Firstly, a no-sew table runner is quick and easy to make. Without the need for sewing, you can complete this project in a shorter amount of time. Additionally, if you’re a beginner or simply don’t enjoy sewing, a no-sew table runner allows you to showcase your creativity without the need for advanced sewing skills. Lastly, a no-sew table runner can be a cost-effective option. Sewing equipment and materials can be expensive, but with a no-sew approach, you can create a beautiful table runner using basic supplies.
Places and occasions to use a no-sew table runner
No-sew table runners can be used in various settings and occasions. They are versatile enough to be used both indoors and outdoors, making them suitable for both casual and formal events. You can use a no-sew table runner at home for everyday dining, to add a touch of elegance to your dining table. They also work wonderfully for special occasions such as weddings, birthdays, and holiday gatherings. In addition, a no-sew table runner can be a great addition to outdoor events such as garden parties or picnics. Their versatility makes them an ideal choice for any event where you want to enhance the overall look of your table.
Materials Needed for a No-Sew Table Runner
Listing essential supplies
Before you begin making your no-sew table runner, it’s important to gather all the necessary supplies. The following is a list of essential materials you will need:
- Fabric – Choose a fabric that best suits your desired style and occasion.
- Scissors – Sharp fabric scissors are essential for cutting the fabric accurately.
- Measuring tape or ruler – These tools will help you measure the length and width of your table runner.
- Fabric glue or hemming adhesive – These adhesive options will replace the need for sewing.
- Iron – An iron is crucial for activating the adhesive and creating crisp edges.
- Iron-on tape – This is an alternative option to fabric glue and hemming adhesive.
- Decorative elements (optional) – If desired, you can gather additional materials for embellishment, such as ribbon, beads, or appliques.
Choosing the right fabric and patterns
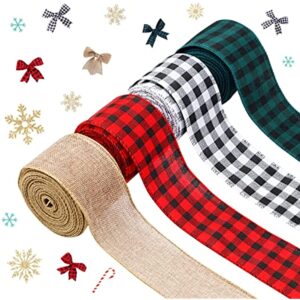
When selecting fabric for your no-sew table runner, consider the occasion and the overall theme of your table decor. For formal events, opt for fabrics such as satin, lace, or velvet to create an elegant look. For casual or outdoor events, cotton or linen fabrics would be more appropriate. Consider patterns and colors that complement your existing decor or the theme of the event. Floral patterns work well for spring and summer, while plaid or metallic fabrics may be better suited for autumn or winter events.
Explaining the role of each material
Each material plays a crucial role in the creation of your no-sew table runner. The fabric is the main component and serves as the base for your runner. Scissors are used to cut the fabric to the desired length and width. The measuring tape or ruler is essential for accurately measuring and marking the dimensions of your runner. The fabric glue or hemming adhesive is used to secure the edges of the fabric together, replacing the need for sewing. An iron is necessary for activating the adhesive and creating a secure bond. Iron-on tape is an alternative option to glue or adhesive and can be used in the same way. decorative elements, although optional, add a unique touch to your table runner, allowing you to personalize it and make it truly special.

Measuring Your Table Runner Length and Width
Determining the appropriate size for your table runner
Before cutting your fabric, it’s important to measure the length and width of your table to ensure a proper fit. Consider the desired overhang on each side of the table. A standard overhang is usually around 6 to 12 inches, but you can adjust it based on your personal preference and the size of your table. Measure the length and width of your table and add the desired overhang to determine the dimensions of your table runner.
Tools needed for accurate measurement
To achieve accurate measurements, you will need a measuring tape or a ruler. A measuring tape is more flexible and ideal for measuring the length of your table, especially if it has curved or irregular edges. A ruler works well for measuring the width and can also be used for straight edges. Ensure that your measuring tool is long enough to cover the entire length or width of your table, depending on what you’re measuring.
Adapting measurements for different table sizes
In some cases, you may want to use your table runner on different tables of varying sizes. To adapt your measurements, consider the smallest table size you intend to use the runner on and the largest table size as well. Choose the longest length and widest width that will fit both tables comfortably. Alternatively, you can create multiple table runners in different sizes, allowing you to switch them out for different occasions.
Cutting Your Table Runner Fabric
Importance of precision in cutting
Precise cutting is crucial when creating your no-sew table runner. Accurate cuts ensure that your table runner looks neat and professional. It’s important to take your time and use sharp fabric scissors to achieve clean cuts.
Steps in cutting your fabric
To cut your fabric, start by measuring and marking the dimensions you determined in the previous step. Use a ruler or measuring tape to draw straight lines where you’ll be cutting. Double-check your measurements before cutting to avoid any mistakes. Once you’re satisfied with your markings, carefully cut the fabric along the drawn lines. Take your time and cut slowly to ensure accuracy.
How to handle cutting errors
If you mistakenly cut the fabric too short or too narrow, don’t panic! There are a few options to salvage your project. Firstly, you can patch the fabric by adding a contrasting or coordinating fabric strip to extend the length or width. Alternatively, you can trim the fabric to your desired size and create a narrower or shorter table runner. Don’t be discouraged by mistakes, as they can often lead to creative solutions and unique designs.

Finishing the Edges of Your No-Sew Table Runner
Explaining why edge finishing is necessary
Finishing the edges of your table runner is essential to prevent fraying and create a polished finished look. Without edge finishing, the fabric may unravel and lose its shape over time. Additionally, finishing the edges adds durability and longevity to your table runner, allowing it to withstand frequent use and washing.
Options for finishing edges without sewing
Since this is a no-sew table runner project, sewing is not an option for edge finishing. However, there are alternative methods that can achieve a similar result. Fabric glue, hemming adhesive, and iron-on tape can all be used to secure and seal the edges of your table runner, preventing fraying. Additionally, you can use pinking shears, which have a zigzag blade that cuts the fabric in a way that minimizes fraying.
Step-by-step guide in applying each option
Fabric Glue Method:
- Lay your table runner fabric on a flat, clean surface.
- Apply a thin, even line of fabric glue to the edge of the fabric.
- Fold the edge over, aligning it with the glue, and press firmly to secure.
- Repeat this process on all sides of the table runner.
- Allow the fabric glue to dry completely before using or handling the table runner.
Hemming Adhesive Method:
- Lay your table runner fabric on a flat, clean surface.
- Cut strips of hemming adhesive to match the length of each edge.
- Place the adhesive strip along the edge of the fabric.
- Using a hot iron, apply heat and pressure to activate the adhesive, sealing the edge.
- Repeat this process on all sides of the table runner.
- Allow the adhesive to cool and set before using or handling the table runner.
Iron-on Tape Method:
- Lay your table runner fabric on a flat, clean surface.
- Cut strips of iron-on tape to match the length of each edge.
- Place the iron-on tape along the edge of the fabric, positioning it between the layers.
- Using a hot iron, apply heat and pressure to the tape, bonding the layers of fabric together.
- Repeat this process on all sides of the table runner.
- Allow the tape to cool and set before using or handling the table runner.
Adding Decorative Elements to Your Table Runner
Speaks about differing designs based on occasion
Adding decorative elements to your table runner can elevate its overall appearance and create a personalized touch. The choice of decorative elements will depend on the occasion and the style you’re aiming to achieve. For example, if you’re creating a table runner for a Christmas dinner, you could consider adding festive elements such as holly leaves, berries, or miniature ornaments. For a summer-themed table runner, seashells, starfish, or a vibrant trim could provide the perfect finishing touch.
Suggested materials for decoration
When it comes to decorative materials, the possibilities are endless. Consider using ribbon, lace, beads, appliques, or fabric paint to enhance your table runner. Ribbons can be layered along the edges or woven through the fabric for a decorative touch. Lace can be attached to the edges or used as an overlay for a delicate and feminine look. Beads can be sewn or glued onto the fabric to create intricate patterns or add a touch of sparkle. Appliques can be ironed or glued onto the fabric to create beautiful designs. Fabric paint can be used to add hand-painted motifs or personalized messages to the table runner.
Attaching decorations without sewing
Since this is a no-sew table runner project, it’s important to find alternative methods to attach the decorations without sewing. Fabric glue, hemming adhesive, or iron-on tape can be used to secure lightweight decorations such as ribbon, lace, or appliques. For heavier or more intricate decorations like beads or fabric paint, it may be necessary to use stronger adhesives specifically designed for those materials. Always follow the manufacturer’s instructions when using adhesives, and allow ample time for drying or setting before using or handling the table runner.

Maintaining Your No-Sew Table Runner
Cleaning and storage tips
To keep your no-sew table runner looking fresh and clean, it’s important to follow proper cleaning and storage techniques. Depending on the fabric used, your table runner may be machine-washable or require handwashing. Check the fabric care label for specific washing instructions. If machine-washable, use a gentle cycle and cold water to prevent any damage. If handwashing is required, soak the table runner in a mild detergent solution for a few minutes and gently scrub any stained areas. Rinse thoroughly and air-dry flat to avoid any wrinkles. When not in use, store your table runner in a cool, dry place away from direct sunlight or humidity. Fold or roll it neatly to prevent creases and wrinkles.
Dealing with common wear and tear
Over time, your table runner may experience wear and tear, especially if it is frequently used. If you notice any loose edges or fraying, use fabric glue, hemming adhesive, or iron-on tape to repair the damaged areas. Remove any stains promptly to prevent them from setting into the fabric. For stubborn stains, you may need to spot clean or take the table runner to a professional cleaner. If your table runner features delicate decorations, handle them with care to prevent them from becoming detached or damaged.
When to create a new table runner
There may come a time when your table runner is no longer suitable for use or simply doesn’t match your evolving style. If the table runner has significant damage that cannot be repaired or has become excessively worn, it may be time to retire it and create a new one. Additionally, if you’re looking to update your home decor or refresh the look of your table for a specific occasion, creating a new table runner can be a great way to achieve the desired change without investing in new furniture or accessories. Be inspired by new fabric patterns, colors, or decorative elements, and let your creativity shine through a new table runner.
Summary of No-Sew Table Runner Creation
Recap of the creation process
To recap the creation process of a no-sew table runner, you’ll start by gathering the essential supplies such as fabric, scissors, measuring tape, and fabric glue or hemming adhesive. Choose the right fabric and patterns that suit your occasion and personal style. Measure your table and determine the appropriate size for your table runner. Carefully cut the fabric to your desired dimensions, ensuring accuracy. Use fabric glue, hemming adhesive, or iron-on tape to finish the edges of your table runner, preventing fraying. If desired, add decorative elements such as ribbon, lace, beads, or appliques using adhesive or iron-on methods. Once completed, maintain your table runner through proper cleaning and storage techniques. Repair any wear and tear using appropriate adhesives. If needed, create a new table runner to suit changing styles or occasions.
Final tips and cautions
When working on your no-sew table runner, it’s important to take your time and follow instructions carefully. Use sharp scissors for clean cuts, and always measure twice to avoid mistakes. Be cautious when working with adhesives, and follow the manufacturer’s instructions to ensure proper use and safety. If you’re using an iron, be mindful of the heat setting and avoid scorching or melting the fabric. Lastly, embrace mistakes and see them as opportunities for creativity and unique designs.
Encouragement for continued crafting and improvisation
Creating a no-sew table runner is a satisfying and enjoyable crafting project. It allows you to showcase your creativity and personalize your table decor without the need for sewing skills or equipment. As you gain confidence and experience, don’t be afraid to experiment with different fabric choices, patterns, and decorative elements. Look for inspiration in magazines, online resources, or even in nature. With each new table runner you create, you’ll refine your skills and develop your own unique style. Enjoy the process of crafting and improvising, and let your table runner creations bring joy and beauty to your home and special occasions.